Self publishing amongst activists has a colourful, jaggedly cut and political history. Zines have been scattered around in one form or another since words were written on paper, but for activists and political artists, zines really took off in the pre-online world of the 1990s. Popularized by the riot grrrl movement, a product of feminism and alternative rock in North America, zines quickly became an invaluable vehicle for manifestos and sharing lived experiences. Nowadays, zines can be found online and in print. This guide will go over how to put together a zine cover to cover and include:
What’s a zine?
Creating content
Figuring out formatting
Distribution
Whats a zine
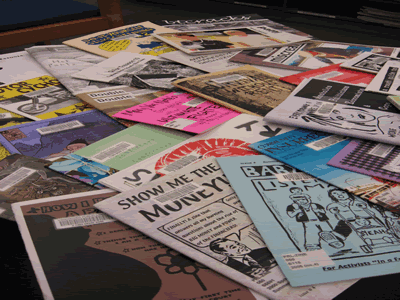
A zine is like a cross between a short magazine and a pamphlet, full of resources, articles, graphics and political messages. They can vary in size and style but often refer to any small circulation self published works. Zines can contain a variety of cut and pasted images, words or hand written sections. A master copy is created and then photocopied in black and white for distribution.
Zines are often highly political tools used by activists to raise consciousness about a specific issue (ie riot grrrls zines focused on taking action against sexual assault) or to act as a community project. Zines can be collaborative. Since the production involves a lot of work, many people work on the content for a single issue.

Creating content
Figuring out a topic can be the hardest part of starting a zine. Because the publication is so small, there’s room to dig deep into a really specific issue. Don’t be afraid to identify a niche audience. Zines aren’t for the masses: keep it small and cheap.
Once you’ve got an idea for a topic, look for content everywhere. Clip magazines for words and images, make collages, collect notes or flat items to include. It’s pretty easy to stare at a blank page and be unsure how to craft it into a zine, but if you’ve already assembled content, it’s just a matter of arranging and adding to it. Invite others to add content and spread out the workload.
You don’t have to make your content in order, but it all does have to be the right size. Put together some flats (base pages you can glue things on) using card stock or other kinds of heavier paper. Make sure that if your zine is half a page, that your flats are all half a page as well. Adding page numbers on the back can help keep track of content and don’t forget an extra layer of glue to make sure everything sticks.
Avoid ballpoint/coloured pens and wet white glue! These don’t photocopy well, although anything goes. Try experimenting with coloured photos, graphics or t shirts or other images.
Figuring out formatting
When considering the size of your zine, keep in mind that you can photocopy a variety of sizes. Half, quarter or full page zines can all work fine. Think about how many pages you want your zine to be (ie smaller size zine, more pages). Collating, or putting the photocopied pages of the zine together in order can be a long process, so try to sort out as many other considerations before hand. Know if you want to cut the paper into pages or fold it before you create copies, so that it will turn out.
Sometimes it helps to photocopy a couple of test pages and put it together as you would the finished zine. This can help bring any issues with spacing, margins or size differences to your attention. Photocopying isn’t the fanciest form of printing, but for beginners it’s cost effective and practical. You can make as many copies as you need and add more pages as you produce more content.
Make sure that your zine turns out double sized on the pages you copy. There’s nothing stopping you from scanning your pages instead of photocopying and distributing your zine as a pdf. This is a substantially cheaper way to go and lets you have the option of emailing your zine. After everything is printed and collated, you can attach your zine together. Mix it up by stapling down the middle, tying it with string on the sides or hooking it with a metal D-ring at the top.
Rookie Magazine has a neat tutorial on putting a simple zine together.
Distribution
Some zines are given away while others have a cost. To work out how much a zine costs, think about balancing your production fees with the price. Breaking even with a zine isn’t going to make it outrageously expensive. Most zines cost between one and three dollars. Try to keep your price as low as you can without going broke.
You can start distributing your zine in person or through stores. If you’re going to sell your zine at stores, work out a consignment deal with the owners. Local bookstores, cafes or other alternative hangouts might sell your zine without charging you. You can woo the less enthusiastic with a consignment agreement. If a retailer sells your zine, you can give them a percentage of the profit. Never take less than 50% of the cover price in your deal and make sure to get it all in writing.
Also check out university campuses and activist organizations – many zine libraries are constantly looking to add to their content. Trading zines is a great way to introduce people to your zine while getting involved in the community.
Support rabble today!
We’re so glad you stopped by! Thanks for consuming rabble content this year.
rabble.ca is 100% reader and donor funded, so as an avid reader of our content, we hope you will consider gifting rabble with a donation during our summer fundraiser today.
Whether it be a one-time donation or a small monthly contribution, your support is critical to keep rabble writers producing the work you’ve come to rely on as a part of a healthy media diet.
Whether it be a one-time donation or a small monthly contribution, your support is critical to keep rabble writers producing the work you’ve come to rely on as a part of a healthy media diet.
Become a rabble rouser — donate to rabble.ca today.
Nick Seebruch, editor